Showing posts with label Cricut. Show all posts

Tuesday, September 20, 2011

Riley Challenge!


Hey everyone, today our challenge is brought to us by Heather Prince

The challenge is to create a distressed/shabby chic card with at least 7 layers (matts are counted as a layer) but the more layers the better!

For my card I used Bundle of Joy Riley to celebrate the coming of my sister's new little baby boy.  He's due in October and her three lil tykes have decided to call him "Henry", much to the dismay of my sister.  We will see what they actually name him!  


The cut comes from the Cricut cartridge, Beyond birthday, and the shadow cut was cut twice and popped to give it some more dimension.  The diamond shape was from the Jasmine cartridge and turned into a kite.  Hope you all enjoyed and don't forget to see everyone elses!  I TRIED to distress the edges but I think I have to work on that a bit more hahah.  Obviously I don't do distress (or layers) all that much so this challenge was a lot of fun to get out of my comfort zone!


Don't forget to check out the Riley and Company Design Team's card on their blogs.

Tuesday, August 9, 2011

Riley Design Challenge


It's the time for another challenge!

This challenge is brought to you by Kelli Santi.  The challenge is Oceans of Fun with Riley! Bring out your nautical side! Use a boat, ocean, beach (etc) and include the colors of red and blue! 


I used Surfer Riley for my layout and cut diagonal pieces of blue paper (using my Martha Sewart Scor-board).  Added a red strip of cardstock on the bottome and some pattern paper.  I used the Cricut Cartridge Stand and Salute for the Anchole and 3D stars and the stamp was a dollar bin find at Michaels!  


hope you guys enjoyed it!  Be sure to check out the other DT designs!


Wednesday, June 1, 2011

T-town Never Down


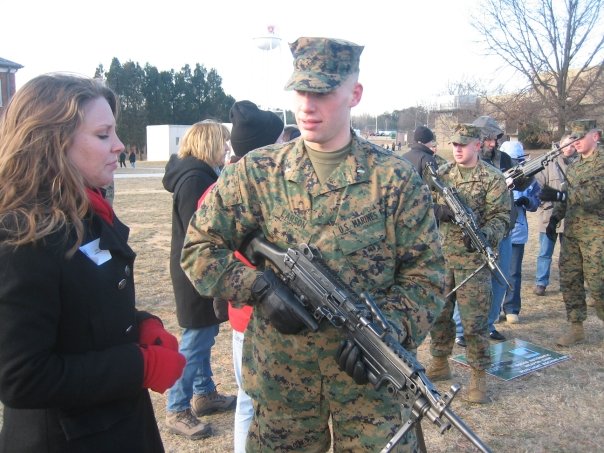
This is a very special project for me that I have for you today.  On April 27th, 2011,  a F-5 tornado tore through Tuscaloosa, AL where the University of Alabama is located.  The tornado killed 50+ people, injured hundreds, and left thousands with absolutely nothing left.  This touched me deeply because the University of Alabama was where I went to undergrad for 4 years.  It shaped a lot of who I am and where I met my 3 lifelong friends.  Going back, I was stricken by how so much had changed and how whole neighborhoods were gone.

View from where my sophomore year dorm use to be

Aerial view of the path of destruction of the tornado

Worse yet, hearing the personal stories from friends still at the University really touched a soft spot in me.  As an athletic trainer, I worked hand in hand with the University of Alabama athletics.  If you're from the South, you would know how all consuming sports, especially Football is to the state of Alabama.  Sports Illustrated released an article, with the cover story being about the effect of the Tornado.  Reading the article, it saddened me to hear about how one of my former football players girlfriend was killed in the tornado.  They were taking cover in a closet and she was tragically ripped from his arms.  Also hearing about how two of my former baseball players, who I had just seen less than a month before when we played them IN Tuscaloosa, had lost everything was just heartbreaking.  If you have the time, please read this well-written article http://sportsillustrated.cnn.com/vault/article/magazine/MAG1186008/index.htm

Mainly I am so proud of how the athletics has stepped up to help in relief efforts.  They have taken their time out to spend time passing out water and goods as well as helping with the cleanup.  Former players who are now playing in the NFL have also donated thousands of dollars in food and water to help those who have literally be left with nothing. Thanks to Javier Arenas (aka Javy) and all those athletes who are helping to patch things up. 

So now that my season is done and I have some extra time on my hands, I set out on making something to help represent the strenght, spirit, and pride of Tuscaloosa.  Houndstooth has a very special meaning for the University of Alabama because it represents the hat that the legendary football coach, Bear Bryant famously wore at each game.  Every Saturday in the fall, the campus is filled with fans decked out in red and houndstooth...from pretty co-eds to fat old drunken men.  A houndstooth ribbon has become the symbol of support for the relief efforts down in Tuscaloosa.  


I used the ribbon off the stand and salute cart, as well as the shadow to make the base and cut it out with the cricut.  I then cuttlebugged the white ribbons with the houndstooth folder and while they were still in the folder, I brayered the ribbon with black ink, kind of like the reverse of this technique shown on youtube  I then used Sure Cuts a Lot to cut out the Alabama A logo and glued it on.  

 
 I didn't think it was enough so I went ahead and used my gypsy to Weld the shadow of the ribbon and banner (also found on the Stand and Salute cartridge) together to make a base.  I then added the words "T-town" which is our affectionate name for Tuscaloosa to the ribbon and cut out two versions (one solid, and one with the letters so it could show through).  I'm not sure which one I like better, the white or red.  Any suggestions?  I wasn't sure if I wanted to make these into cards or just keep them as is and make them into a magnet or even something to hang in my car.  But I may even sell them on etsy and have all proceeds go to a charity of relief for Tuscaloosa.  

Anyway, I know this is a long post but this just meant so much to me, so thanks for all that actually read this.  I'll leave you with pics that show the resilient spirit of the people of T-town.  Roll Tide!


Saturday, May 21, 2011


Sorry I have been missing in action recently!  It's been super busy with the closing of our regular season and tomorrow is our last home game.  It's been a very special year for me and this has been my favorite team ever.  I wanted to thank them by making a special little card for them and writing a little note....all FORTY FIVE of them!!!  So as you can see, I've been very busy coloring baseball Rileys!  Here it is mid-process

Let's just say I was exhausted and so was my copic E33.  I modified the image a little bit to give it more of a jersey like feel and the appearance of sleeves.  Then colored in the bats exactly like the ones my guys use.  Picture for reference....
This is W, he's a Cajun.  His Aunt gave me the best jambalaya recipe. 

The best way to tackle all those cards was to make a sort of an assembly line.  I used Sure Cuts a Lot and Inkscape to create the South Alabama logo and their numbers to customize each card.  They were matted on grey and navy cardstock with the grey background watermarked with a baseball stamp and versamark ink pad.  Some of the  moose even got eyeblack to match their respective recipient!

Here's a little closeup of a card and placed in their lockers.


I also made 50 red velvet baseball cupcakes and places them in boxes that used to hold baseballs.  They're ingenious for transporting cupcakes!
I'm completely wiped out and have a long day of festivities tomorrow (or should I say today).  It will be senior day and I have 10 seniors finishing up their careers.  Our coach is also retiring after 28 years as the head coach of South Alabama.  He's one of the most decorated college baseball coaches of all time and needless to say, it's going to be a special and moving day tomorrow.  Sniff, my kids are growing up...

Well now you know where I've been for the past week!  

Tune in tomorrow for a sneak peek of the upcoming Riley Stamp Release!!!  I can't believe it's already upon us!!!

Saturday, March 19, 2011


So, we're currently on the road again for the weekend...which means that I spend most of my days in a comfortable hotel room or watching a baseball game.

Unfortunately it means that I'm not getting in much crafting in.  Before I left, I was able to get a quick and simple card in.  (Editor's note:  In actuality, I totally forgot it was my sister-in-laws birthday last Saturday, and had to whip up a card quickly and pop it in the mail!)  It was a quick card I made using my Gypsy/Cricut and the Create a Critter Cartridge.

My sis-in-law loves birds so I usually make her cards themed around that.

Nice quick card, just cut out the little birdy with the little accessory nest that came with it.  Slapped it on some patterned paper I picked up at Hobby Lobby awhile back.  I couldn't center it for the life of me.  I finally gave up and kept repeating over and over the mantra "If it was supposed to be perfect, I would have just bought a card from Hallmark...if it was supposed to be perfect..."!  Happy Birthday was stamped with a Papertrey Ink Stamp off of Birhday Basics.  That's about it!

I figured I'd throw in another old creation since I won't be posting in awhile.

For Halloween, Topher and I decided that we wanted to carve an unconventional pumpkin.  Now Hedgehogs are kind of one of our favorite animals (up there with moose).  So we took the the create a critter hedgehog cute and cut him out at about 5".  We glued it on to the pumpkin face, carved the outline, and started cutting away!


Yes indeed we used the Cricut tool set as our carving utensils.  Topher got a little messy while carving the feet.  We cut out the nose, eyes, smile, and body and with the face and feet, we thinned the walls to let the light shine through.  

Here's our finished product lit up!  The hatchmark is since we took the picture through the screendoor, hahah sorry!  


Thursday, March 17, 2011


Quick card I whipped up for my friend Aaron who is sick.  I met Aaron at a Miss Taiwanese America event, and we've been friends ever since.  His happiness and joy for life just radiates everywhere.  Unfortunately, he's come down with pneumonia, which is especially critical since Aaron has muscular dystrophy.  Luckily, he's was discharged yesterday after being in the hospital for a week.  I fiddled with the look of this card for a bit, and made it during batting practice during our baseball game haha!
I used the sick Riley stamp and colored him in with E33 and E37 for shadowing.  
I cut him out using the mini-monograms cartridge at 4 1/4" and the center cut.  I was nervous since it was my first time trying to cut in image out as opposed to stamping on a pre-cut piece!  It came out fine.  It seemed a little plain with just one Riley so I figured...what could be better than...TWO Rileys!  


Sorry I don't have any pictures of coloring in the second Riley (Flowers Riley) and added the mini sentiments from papertrey Ink.  I glued these Rileys on blue mats (also cut out from Mini monograms) and added a dollar bin ribbon.  I cuttlebugged part of the yellow background with spots and dots and the base is papertrey ink in white ( I LOVE the heft!).  The inside was stamped with a wood block stamp I got from a pack at Michaels.  


Here's a pic of Aaron and myself!  I hope he feels better!


Thursday, March 10, 2011


Just a little thank you card to thank Topher's Grandparents for sending me their trademark bran muffins and a birthday card for my birthday!  I love them so much and are the quintessential grandparents from New York that you see in the movies!  I've been trying to be a little creative on my layouts while keeping them simple.

So I used the Farmer Riley and Sophie stamp for this card.  Colored them in with Copics, here are the ones I used


For the antlers and hooves, then the ones for their faces


For their clothing, the belt and piewere colored in with E59 and E35 I believe, and the pitchfork and piepanwith my Sakura Jelly Roll Pen


Initially I was planning on a darker and more vibrant green color palette (mainly greens and yellows).  But I found the plaid pattern paper (no idea where it came from) and I thought how lovely it would be and it kind of matched Sophies shirt. Thank goodness I don't get too uppity about colors needing to match exactly.  I cut out the circle from the pale green paper at 4 1/4" from Mini Monograms and then cuttlebugged it with the Bird and Swirls folder.  Matted everything on brown kraft paper and then again on some light blue paper.  I cut the little "bran muffin" from the create a critter cartridge.  They are so yummy toasted and with some butter.  The sentiment is stamped with brown versafine ink and was a wooden stamp set purchased from Michaels one day when I was trying to build up my stamp collection.  


The base was flimsy Recollections white cardstock so I had to reincforce wht inside with another layer of brown cardstock to give it some stiffness.  I printed out a sentiment on the plaid paper to give it some interest and tie it back in.  Not so crazy about it, but it's ok!


Wednesday, January 12, 2011


Sorry for the blurry picture, I really need to get an actual camera instead of always using my iphone!

So this is a set of cards I've been working on for quite awhile.  I started them over the summer and was meaning to give them to some of my former VMI (Virginia Military Institute) athletes who are now stationed all over the country and world.  I wanted to give it to them for 4th of July, and then Veteren's Day, and then Memorial Day...but I just couldn't get them to look the way I wanted.  So FINALLY, I was able to sit down and get everything squared away!  I'll admit, I'm very proud of this set of cards, almost as proud as I am of the people they went to.


So this card is for Jakes who is now stationed in Afghanistan.  He's in the army and so I paper pieced a little camo background for him. The frame and My Hero cut for all of these comes from the stand and salute cartridge.  Military Riley was the stamped I used.  SOOO CUTE AND I LOVE IT!!  I scored the edges for some interest.  Here's a pic of Jakes over there in Afghanistan.


Sorry for the blurry picture.  This is for Lynn, my marine who flys helicopters and is stationed in Pensacola for the time being.  I used patterned paper from Michaels for the inside, and the white frame was cuttlebugged with the diamond plate folder and rubbed with a silver stamp to bring out the pattern.  I used a gold sakura gelly roll pen to color in the anchor.  

Here's Lynn


Last but certainly not least, here's the card I made Tommy who is in the airforce and flying jets in Wichita.  Same diamond plate paper, I just arranged it different, and also added a scored border on his.  
Here's Tommy in his formal wear.

I loved making these cards and the people I made them for.  I think these will be a favorite for a long time coming.  


Saturday, December 18, 2010


Peppermint bark anyone?  So I have 40 college baseball players and so I wanted to make them a little gift for the holidays.  I figured guys would rather have sweets instead of a frou frou card, so I decided to make them little goody bags of homemade sweets.

My version of "Peppermint bark"is really simple and easy to make.  I just melt down a bag of white chocolate chips in the microwave and add rice crispy cereal until it's the consistency of rice crispy treats.  Spread it out nice and flat so it's just a thin layer on a sheet of foil and then sprinkle Andes Peppermint baking bits on top.  Pat down to make sure the baking bits are in!  Put in the fridge for about 15 minutes and break it up!  It keeps forever but it probably won't last very long.  Guys especially find it irresistible.


I just used the little reindeer guy from the Create a Critter cartridge and I believe I cut him out at 3/4 inch.    Paper was bazzil basics from Michaels and I just cut alternate scarves in green and red.  (By the way, the gypsy is a god send in mass production, thank you, thank you, thank you).  The tags were just labels I printed out on the computer and slapped on to the little treat bags!

Sunday, December 12, 2010


Here's my second set of Christmas cards (and my main one, that little deer is the theme this Christmas).

All of the cuts came from the Create a Critter Cartridge.  The Season's Greeting Sentiment is from the Seasonal stamp set from Papertrey Ink and I used Tim Holtz distressed ink in red brick.  One thing I must say I'm grateful for is that I have the stamp-of-a-ma-jig since I am terrible at aligning my stamps!  For the first dozen or so cards I made I heat embossed the lightbulbs to give it sparkle, but it was inconsistent as far as thickness and would stain a bit.  I went and purchased some glossy accents and it worked BEAUTIFULLY (oh Glossy Accents, why did I not purchase you before?!)  I'm sorry I do not have a picture of the new and improved holiday lights!


Here's the inside sentiment and the corresponding envelope I made.  I must say, I wouldn't be able to make my envelopes without the envelope guideline from Scor-Pal.  That is a lifesaver!